Showing posts with label crafts. Show all posts

Blogmas 2016 : Day 11 : Holiday Apartment Tour!

Sunday, December 11, 2016


Get ready for a veeery photo heavy post! 
I'll be less verbose in this blog post and let you guys just focus on the pictures. This year, I decided to just decorate my living room/dining room space. Next year, I may branch out to the kitchen and bedrooms as well. Hope you enjoy! 


Let's start off with the sofa. You might recall the crimson side pillows from my fall apartment tour. I kept those the same and changed out the accent pillow. 


This accent pillow is also from HomeGoods for $24.99. I went holiday decor shopping in mid-November and was so surprised to see that everything, including the decorative pillows, had all been picked over. I got super lucky with this find! It's a beautiful standout piece and pops against my dark gray sofa color.  


I looooove the way my side table turned out (don't mind the white chips in the table, though). I'm obsessed with the gold flecked mini Christmas tree, which was only $9.99 from HomeGoods. It may be hard to see in the picture, but the branches are speckled with gold glitter. I hung some mini snowflake ornaments that I found at Walmart for only $1.99. The block sign is from HomeGoods for $3.99. Under it, I put these cute mini gift boxes I got from Michael's last year. Of course, I couldn't resist getting these cute wood animals decked in winter gear that I found at HomeGoods for $5.99 and $4.99.  I just love how festive this side table looks!


This is my coffee table centerpiece. Again, the gold tray is recycled from my fall apartment decor; I purchased it at Target over the summer for $16.99. I also recycled the pine cones from my fall tour. I love how pretty ornaments look mixed together with pine cones! These red and gold sparkly ornaments were from Dollar Tree for only $1! The mason jar vase is actually from my parents' house. My mom was planning on throwing it away, so I took it and decided to use it as part of my holiday decor. The gorgeous stem inside it is from Michael's for only $7.99 (and by that I mean $3 with sales and coupons). It's super sparkly and looks like freshly fallen snow on pine branches, very festive!


This is my Christmas tree this season! I couldn't get the lighting for the photo right so sorry it looks a bit off in this photo. It's a cheap-o pre-lit 7.5 feet artificial tree from Walmart for $39.99 that took me about an hour to get the branches splayed just right so that it didn't look bald. It doesn't look perfect by any means, but for the price it's not too shabby.


Here's a close-up of the Christmas tree. So, surprise, it's actually a black Christmas tree. I misread the box and didn't realize it until this morning when I was looking at my tree up close. You can't tell in the evening, but in the daytime it definitely sticks out as black. The ornaments are from Target, a box of 24 was $5.00 each and they have tons of color schemes to choose from. I picked up a box of red, green, gold ornaments and then another box of blue and silver ornaments. Love the way they look together! I didn't put any specialty ornaments this year, but I might next year.


Here is my dining table decor. I'm not completely satisfied with the way it looks, to be honest. It looks a bit plain and could benefit from a table runner. But, for now it will suffice! The poinsettias are artificial stems from Michael's for $9.99 (approx $4 with sales and coupons). Placemats are from Kohl's for I believe $7.99 each, but were on sale for $4 each. Tablecloth and cloth napkins are from HomeGoods for $14.99 and $5.99, respectively. Crockery is recycled from fall apartment tour and is from Pier 1 Imports. 


Here is the view from my dining table. Love how lit, warm, and inviting the space looks with these additions.


Along my furnace, I hung some clear white holiday lights that I picked up from Target for only $2.99. On either side of the heater I hung my mini stockings I got from Michael's a few years ago. These are soooooo cute, not sure if they still sell them, but they were only $4.99 regular price each!


I finally found the perfect piece for my long furnace area! For the last few months, I've struggled with what to put in this area. Luckily, when I was in Pittsburgh over vacation my mom was also planning on getting rid of this cute little dish/tray. But I decided to take it and use it for my furnace since it's so long and fits so well! I wanted to put some large ornaments inside, but didn't have a chance to go pick any up from the store. Instead, I put some small stems I had from Michael's and extra ornaments that wouldn't fit on my Christmas tree. 


Last but not least, I have to talk about this light pink Christmas tree on my work desk! Not the best picture, but I'll have better shots in my work desk decor post coming up in a few days. I loooove this tree. I think it might be one of my favorite pieces from my holiday decor haul this year. It's a baby pink-gold glittered bottlebrush tree from Michael's that was only $4 after sales and coupons! This fits my bedroom decor so well, and really makes my work desk pop.

#healthyholidays Day 11: Ahhh, nothing major today. I guess I'm happy that I didn't binge this weekend! 

Fall Apartment Tour

Wednesday, November 2, 2016


Good morning guys! I got my second cup of coffee right next to me and I'm ready to get some serious blogging done. I'm finally on vacation! Intern year has been flying by (which is both a good and a bad thing) and it's already November. Such a bittersweet feeling. Before winter smacks us in the face, I wanted to share some pictures of my fall apartment decor. This year, I was inspired by Pinterest and bought larger times, that were a bit more expensive, but really packed a punch. I only decorated my living room and dining room, but I'm so happy with the way they both turned out! I didn't know how to dress up my kitchen or bedroom for the fall since they are smaller spaces (and I didn't want to shell out another $100 decorating them!) so I'm going to leave that challenge for next year.


Alright so the first space you enter once you get into my apartment is the living room. The side table next to the couch was really fun to decorate. The sparkly pumpkin that has "give thanks" carved on it was only $9.99 from HomeGoods and really takes the stage here. It looks gorgeous next to the sparkly autumn leaf stems I picked up from Michael's. Next to it, the small mason jar with an owl on the lid has tiny pinecones inside (which you can't really see in the picture here). I've fallen in love with the look of pinecones in the fall. And then I decided to scatter a few smaller knick knacks like some the Halloween-themed napkins from HomeGoods, some candy in a bowl, and these cute fall-shaped coasters I found at Stop & Shop.


Next to the side table is, of course, the sofa. I don't think picture does justice to exactly how bold and beautiful the pillows really look. These were easily the most expensive items I bought this season, but they were so worth it because of how beautiful they make my living room look. They really steal the whole show. All pieces are from HomeGoods. The crimson pillows came in a set of 2 for $24.99, and as a bonus, they multitask for both fall and Christmas. The center beaded pillow is my favorite find of the season, and it was only $16.99! It's a beautiful, beautiful beaded and sequined pillow in the shape of a pumpkin and autumn leaves.


Next we get to the coffee table. There are soooo many gorgeous fall centerpiece ideas on Pinterest. But, I sort of made my own look this year. I wanted to use this gold tray I picked up at Target back in July as the base for my centerpiece. I scattered some cinnamon-scented pinecones with dried leaves and fruit that I bought at Michael's to bring that cozy, rustic, fall look to my living room. I found the jar of beaded pumpkins and berries for only $6.99, and the WoodWick candle (I believe the scent is Apple Crisp) for $7.99 both at HomeGoods and they make excellent additions to the centerpiece since they embody the rich colors of fall. The tray was still looking a bit bare so I found some glittered copper acorns and autumn-colored glass beads at Michael's and added them to gold votive holders for an extra pop of color and texture. All in all, it may not be the most Pinterest-goalworthy coffee table center piece out there, but I really had a fun time making it and I don't think it turned out too shabby at all.


Lastly, the dining table. I'm so so so excited that I finally have a dining table in my apartment. Dressing up the dining table is so much fun. The possibilities are limitless. I wanted to add a dash of plaid to my fall apartment decor, and this tablecloth and cloth napkins really fit the bill with their rustic autumn colors. I recycled my cream-colored placemats from the summer, but purchased the Spice Route plates and bowls from Pier 1 Imports to put on top of them. I have had my eye on this collection for soooo long. It's the perfect shade of crimson for the fall and winter, and makes a bold statement. So happy that I finally purchased these. And lastly, since my dining table is small, I kept the centerpiece simple with just this adorable ceramic mason jar-esque vase containing sunflowers and pumpkins.


I hope you guys liked my little apartment decor tour. It's not as beautiful as the ones you see on Pinterest. However, I wanted to keep it simple, but really make a statement and I'm happy that I accomplished just that. Definitely room for improvement next year, I'm thinking maybe with lights and maybe some more artwork. There's a couple pieces I forgot to take a photo of, like my Halloween ornament tree and my vase with some more autumn stems, but I'll add them to this post once I get back to New York. All in all, I had a really fun time decorating my apartment and loved the way it turned out, especially for a small space. :) 

Crafting Weekends: Glitter Dipped Wine Glasses

Thursday, December 24, 2015

*image credit goes to Cupcakes and Couture

I've been meaning to write this post for months now! I first made these glasses as a present for Mother's Day but I never got around to posting it. I've since made a dipped wine glass for myself so I remembered to take photos this time! I freaking love making stuff like this. It is such an easy, cheap craft to make and it looks so unique and polished! Not to mention that you can actually use it regularly. My favorite part is that you can reeeeallly customize these glasses any way you want -- different glitters, different colors you can use, different gluing techniques, patterns, and a bunch of different messages and patterns you can write/draw on the actual glass portion. It makes for a super cute, cheap, personalized gift for weddings, parties, Christmas, birthdays, ANYTHING. I've even seen it being used as bacholerette party favors on Pinterest! Looking back, I'm actually regretting not making some more for our Thanksgiving and Christmas dinner table this year! But anyways, enough rambling.


So the materials. First off, you'll obviously need a clean, plain wine glass. You can find these anywhere. I bought mine at Walmart for $1. You can use a more expensive wine glass, although I've read that cheaper glasses actually hold up the glitter and writing better. You'll also need some loose glitter. This is the fun part! There are soooo many different shades and sizes of glitter and you can get super creative by mixing different colors, textures, etc. For mine I chose a champagne white gold, which is my favorite metallic. I bought mine from JoAnn Fabrics in a shakeable container (is that what they're called?!)...you know, the one with holes on top so you can shake out the glitter easily and don't have to dip your hands into it. Makes for an easy, mess-free application! You'll also need some Mod Podge, which is gonna act as the glue for the glitter to stick to. There are SO many different varieties of Mod Podge. I chose the plain Mod Podge with a gloss finish and it worked really well. It's also nice to have some sort of clear acrylic sealant spray to lock your glitter in place. Although it's technically optional, it's going to add a nice finishing touch to your wine glass and make it so that the glitter isn't going to scrape away from your glass with continued use. And if you're giving it as a gift, I think it's nice to add that professional touch. I used the Mod Podge brand, although they had other types as well. Whichever one you choose, make sure it's clear and has a gloss finish! You'll also need a foam brush, which you can buy at any craft store, to paint on the Mod Podge. Lastly, you can buy some metallic Sharpie pens to jazz up your wine glass if you want to add any writing or doodles to your wine glass. They don't have to be metallic although I think metallics go really well with glitter!


So I didn't take step by step pictures, but it's incredibly easy to figure out.

  1. Plan out your wine glass. Like I said, the possibilities are endless. You can choose to coat the entire stem in glitter, do just the bottom, cover the entire glass, etc. You also want to decide if you want to doodle on your glass with Sharpies. For my Mother's Day present, I chose to write "Mom" in cursive with a bronze Sharpie. Check out Pinterest or Google Images for ideas. 
  2. Setup to glitter! Lay down tons of newspaper on your work area so it's easy to get rid of the glitter when you're done. You also want to cover all parts of the wine glass that will not be getting smothered by glitter, especially the insides of the wine glass.You can do this by taping newspaper around the outside of the glass and putting some on the inside of the glass as well.
  3. Mod Podge time. Using your foam brush, coat your wine glass with a thin layer of Mod Podge. You want to cover every single inch of the glass that will be getting glitter-ized, but you want to make sure it's not gooped up or dripping with Mod Podge. 
  4. Sprinkle on the glitter. Immediately after you cover your glass with Mod Podge, shake glitter to cover the entire area. This is where a glitter container with holes comes in handy! You can go crazy and coat excessively, making sure there are no "bald spots". Remember, you can shake off any excess glitter, but it's a pain to go back and spot-treat any missed areas (been there done that)! Once you've covered the entire glass, leave it alone for about 30-60 minutes. The longer, the better.
  5. Decorate your glass. If you want to add any messages, writing, or design on your glass, remove the newspaper covering your glass and draw directly on the glass using your Sharpies. Let it sit for about 15 minutes.
  6. Seal the glitter. Once you're happy with your glass, time to lock it down! Hold the sealant spray about 6 inches away from the glass and spray while twirling your glass until each area has an even coat. Do this for the entire glass -- including the parts written in Sharpie and any blank areas. Don't spray excessively at any one point otherwise it might get chunky in one area or the glitter may spray off.You want to give a fine, thin coat to each part of the glass. 
That's it! That's how easy this project is. If you love glitter as much as I do, you can try with different types of glasses, different colors of glitter, different designs, etc. Like I said, the possibilities are literally endless and I love how practical this craft is! Hope you guys enjoyed..here's to many more crafting posts this coming year!

Halloween-Themed Cupcakes

Sunday, November 1, 2015


Look at me on a roll with all these posts this week! Definitely the post-CS and Halloween spirit! As I mentioned in my Fall Favorites post, I wanted to use this weekend to practice some cupcake decorating. After browsing Pinterest, I decided to attempt some monster cupcakes. They require super simple piping techniques, perfect for a beginner, and come out with excellent results! And they're a super fun craft to do with kids. I had a really fun time making some monsters with my younger brother.


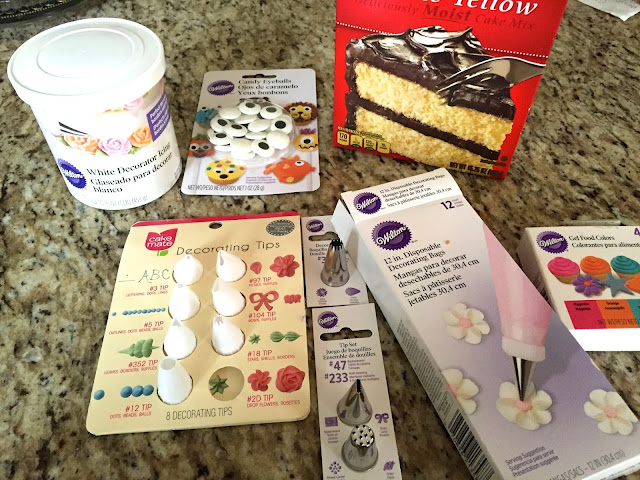
Here are the supplies I used. It may seem daunting, but don't worry you don't need all these things! The only things that are essential to making these monster cupcakes are buttercream/decorating icing, a few decorating tips, and candy eyeballs. 

The Cupcakes -- You can make the actual cupcakes using any recipe you have lying around. To keep things simple, I chose to make yellow cupcakes from a box. The Duncan Hines box mix make really delicious cupcakes! 

Cupcake Icing -- This is the most important part and makes the difference between 'meh' vs. artisan cupcakes. You don't want to get just a regular can of frosting from the store!!! I cannot stress that enough. I've tried to decorate cupcakes in the past using the cheap $2 frosting cans and the results have been disappointing. That type of icing is super runny and it's literally impossible to decorate with it. You want a stiff icing that can hold a pattern, which is crucial to cake decorating. I would recommend going out and buying icing that is specifically meant for decorating. You can also make your own buttercream icing. But if you're lazy like me, try the Wilton White Decorator Icing from JoAnn Fabrics (also sold at Michael's). It was my first time using it and I was really happy with the results! 

Decorating Tips -- I only used 3 types of tips for my cupcakes, but I've pictured a bunch of different tips to show you that there are endless varieties when it comes to cupcake decorating! The 8-pack decorating  tip pack pictured above is from Walmart for only $3! Plastic tips are just as good as metal ones in my opinion. JoAnn Fabrics has a wall of different icing tips, many of which are only $0.99! For the cupcakes pictured above, I used an open star tip (purple icing), a grass tip (teal icing), and a closed star tip (pink icing). Again, you can get creative and use different types of tips to get different effects! I definitely LOVE the grass tip for making hairy-looking monsters! If you're new to cupcake decorating and have no idea what each tip looks like or the designs it makes, check out this video. She does an excellent job of explaining basic piping tips and techniques! 

Decorating Bags -- I like using decorating bags specific for cake decorating since they are super sturdy. They're relatively cheap too. However, you can also get away with using Ziploc bags if you don't want to invest in fancy decorating bags.

Food Coloring -- You can get a variety of different food coloring gels at craft stores, but you can also use whatever you have lying around and get creative with coloring! A few of my friends have used jelly, fruit syrup, etc instead of actual food coloring in the past.

Candy Eyeballs -- from JoAnn Fabrics for only $4.99! They have small ones and large ones. I chose the large ones for regular-sized cupcakes. Try the smaller ones for cookies or mini cupcakes.

Once you have all of your materials, now's the fun part! Get creative with the piping and try out different ones in different shapes and colored icing. I used the open star tip to make the purple monster, and the grass tip to make a fuzzy hairy monster, which was my favorite. I had a few writing gels I had lying around to make mouths with, but you can use chocolate frosting plopped in a plastic bag to make mouths with. The most important part is remember to have fun and share this memory with loved ones! :) 

Projects I Hope To Complete Before 2016

Saturday, August 1, 2015

It's been soooo long since I got a chance to craft. I know, I know no matter how busy you are you can always make time. I've done a total botch job at taking care of my health this year, and have majorly slacked in terms of keeping up with my hobbies. I'm hoping to do a better job at it this year and finally complete some of the projects I've had on my list (and Pinterest) for ages. Here are some of those projects along with their links.


Scrapbook. I've been working on a scrapbook for so long, but never managed to complete it. I've printed out a bunch of pictures, got pretty paper, embellishments, and have a lot of ideas but I just never got around to completing it. I'm hoping to finish it by the end of this year, or at least add my most memorable memories to my scrapbook!


Customized wine glass. I made one for my mom this past Mother's Day, and have been itching to make one for myself since. I dipped the stem in white-gold glitter and then wrote "Mom" in fancy letters on the main portion of the glass using a metallic Sharpie. I want to recreate a similar wine glass for myself, except write "Cheers" or something fun on the glass.


Glitter-dipped mason jars. Another glittery craft! (can you tell that I love glitter??) I think silver-glittered, clear mason jars would look so beautiful on my dresser, especially to store my makeup brushes. It's so easy to add glitter onto literally any surface with Mod Podge, a foam brush, and some loose glitter, and it looks incredibly amazing and spices up your space.


Decorative fall pillows. It's no secret that I cannot wait for fall. I also really want to get into sewing this year and the easiest sewing project for beginners are pillow covers. And the best part is that you can customize them a million different ways by choosing different types of fabrics, appliqués, designs, shapes, sizes, etc etc. I'm hoping to make some crimson square pillows for this fall season and then adding this adorable patchwork pumpkin design to add a bit of fall to my apartment.  


Fall centerpiece. I've always wanted to make my own centerpiece, but never make one since I don't have a formal table to set it on. However, I think I may make one this year using some pinecones, fake leaves, plastic pumpkin, candles, etc and then set it on our kitchen counter or windowsill, or somewhere eye-catching. This is such a fun little craft that again you can customize a billion different ways.

Crafting Fridays: Glittery Memory Cork Board

Saturday, April 4, 2015


I haven't done a crafting project in forever! School has just been nuts over the past few months, so it's been nice to have some spare time this month to be more creative. I've been wanting to make a memory board for years now. I had a bunch of photos sitting on my shelves that I wanted to post up on my wall that I could look at on days where I was feeling a little down or stressed out. It's a really nice reminder of all the great moments I've had with my friends and family over the years, and a constant reminder that I'm never alone. It's so easy to get bogged down by all the negative things going on around you that it's good to have a physical reminder of the fact that you have a great support system in your friends and family.

This memory board was super simple to make. I didn't go crazy decorating it because I wanted to save the majority of the board for photos. I started off with a plain, large cork board I got from Jo Ann Fabrics for a very reasonable price, I believe only $5 or so. I also got a spool of medium-thickness pink glittery ribbon to give my board a pretty border. I laid out the ribbon along each side and pinned it down on the edges. You can tape or hot glue it onto the board if you don't want a pin sticking out at each edge. However, I've found that pinning is the most effective and least messy method. And honestly, since I used clear thumbtacks they don't show too much.

Next, is the most fun step - organizing your photos! I used clear thumbtacks to attach the photos onto the board. Definitely use the clear tacks, because the colored opaque pins give the board a really messy, cluttered look based my previous experience. I had a bunch of photos I had developed a few months ago for my scrapbook and photo album. I selected some of my favorite, most memorable photos out of the bunch to pin up on my board. I wanted to put some postcards and maybe some inspiration quotes but I didn't have enough space for them. I selected a variety of photos -- some of my family, my friends, my 21st birthday, my vacation to Europe, apple picking trips, etc. I overlapped them so there was no board showing through the pictures. I do want to add some more recent photos to my board in the future. I really like the selection of photos I have up right now though, and found myself smiling as I was pinning them onto the board. I wish I had more space, but for now this is a great start.

So there it is, a simple but fun craft for a Friday night. It only took me about 20 minutes, but it's something I can see myself cherishing for years. I love making memorable, keepsake crafts like that :) And you can even make a memory board and gift it to a family member or a friend! I may even make one for my mom this coming Mother's Day. Hopefully I can get back into the swing of crafting more often! I have a bunch of art projects I want to work on next, so I'm hoping to use some of my free time this month and working on those.

Crafting Fridays: Spring Cleaning

Monday, January 19, 2015


I haven't done a Crafting Friday in a while! Adjusting back to school has been quite difficult and I honestly haven't had time for too many craft projects. Next to time, I think one of the biggest obstacles that prevented me from starting a craft project was the fact that my room has been so cluttered. I had bags of crafting hauls that I hadn't put away, and the art stuff on my bookshelf was a huge, disorganized mess. So this weekend, I decided to deep clean my apartment a little and get things more organized. I know it's not exactly an 'art project' but having an organized life and space is very important and sets the foundation for having a happy, healthy, productive life which is my biggest goal for 2015.

I took some snapshots and here are some of my triumphs over the weekend.


My new and improved crafting shelf! In my huge pink box, I have a bunch of random bits and bobs including construction paper, wooden crafts, felt projects, a small blank canvas, etc. I went through the whole box and did end up distributing out some stuff, so it's much much much cleaner than before! Right next to it, I have a pretty little wooden pink box containing some of my most used acrylic paints as well as a vase for my paintbrushes. I haven't painted in quite a while, but I'm hoping to get back into it sometime soon! Right next to my 'paint station', I have a couple photo albums and then also a small snapware box containing some random jewelry pieces. And then finally on the right is my scrapbooking station. The sparkling silver box contains photos, memorabilia, letters, stickers, gems, etc for scrapbook designing. The three-tiered snapware box contains extra gluesticks, more paint tubes, pom pons, glitters, etc. And on the very right I have scrapbooking paper and my scrapbook album.


I finally cleaned my kitchen as well, which needed some serious deep cleaning! I re-organized my fridge, shelves, pantries and also cleaned the surfaces. The countertops do look a bit cluttered but that is because we have a very very small space and a lot of appliances, so we have very minimal space for other things. But this is much much better than before, and I'm overall very happy with it.


Our new dish closet! The plates and bowls are on the left (most of them are still in the dishwasher) whilst the cups and mugs are layered alongside it. Needless to say, we have a lot of mugs and drink ware at our place. And then the second shelf has our bigger bowls for cooking and baking, as well as some tupperware and travel mugs.


Our much-loved tea & coffee section. Lots of herbal tea, some green tea, hot chocolate packets, random coffee sachets, K-cups, etc.


My new and improved closet! Again, lots of stuff in a small space but much more organized than before. I've arranged them according to type of clothing. It progresses from tanks to t-shirts to long tees to cardigans to chunkier sweaters to hoodies. And amongst each type of clothing, they are arranged by color. I also went ahead and threw away any old, ragged pieces of clothing I had that I knew I would never wear (turns out I had a lot!).


And lastly, my shoes. I obviously photoshopped this picture to maximize the brightness so you can see clearly. I threw away a lot of worn out shoes and arranged my new shoes according to ones I would wear most. I also have some boots and flip flops that wouldn't fit in my shoe rack.

So there you go, my big spring cleaning! I still have some more things to clean out, but this was a good start. It feels great to start the new year off with a clean, organized house. Now that my things are cleaner and more organized, it makes starting a crafting project a lot easier since I know where things are and I have space to do it. Having an organized home is much much less stressful than coming home to a disorganized mess every day.

Hope to have more crafting projects up in the next few weeks! My next project I think is going to be my inspiration board. Stay tuned!

Crafting Friday: Scrapbooking 101

Sunday, December 28, 2014


So I realize it's past Friday, but I was busy this past week and didn't get a chance to write this post until now. I've been meaning to start scrapbooking for literally several years now, but never quite got comfortable doing it. I started a scrapbook when I was like 16, but it was messy and just not as nice as I wanted it to be. But I think this year is the year that I want to give it one more shot and create a 2015 scrapbook. Tossing around the idea of a scrapbook got me thinking of starting Crafting Fridays, where I take an hour out of my time each Friday to spend doing some sort of crafting project. I really love crafting, but I always get busy during the year and never have time to devote to crafting projects. I think this is a great way to set aside just an hour a week into something I enjoy doing, and it's a great study break as well!

So my first project of the year (and to be continued throughout the year) is my 2015 scrapbook. I was considering making a cumulative med school scrapbook but since my photos thus far have been patchy at best, I decided to just make a scrapbook for the year 2015. This way, I can take photos of certain events I want to keep into memory and add those to my scrapbook instead of digging around for old photos like before.

So for my very 1st Crafting Friday, I found this really quick and easy and really informative video about tips for scrapbooking (embedded below). It has really good tips for what kinds of things you need, the basic tools, and has a demo on how to make a pretty scrapbook page. I really like the idea of layering pieces of paper as "frames" for your photos or text boxes! I really like how much that makes the pages pop, and what a clean effect it gives. I'm hoping to hit up JoAnn later today and pick up a few bits and bobs for doing a practice scrapbook page. I'll probably make it Christmas-themed and add photos from this past Christmas. I'll insert a photo of how that turns out on my next Crafting Friday!


FREE BLOGGER TEMPLATE BY DESIGNER BLOGS